
How to Build a Horizontal Cedar Fence
(DIY Backyard Fence Guide)
Our backyard fence had a embarrassingly huge lean, failing posts, gates that wouldn't stay closed, and pickets that weren't even attached anymore. It was long past time.


I'd been collecting fence inspiration on a Pinterest board for a while, and the design I kept coming back to was a horizontal board-on-board cap and trim privacy fence. Modern, clean, substantial. I knew I could build it myself — and save a TON of money doing it.
Tools I used to build this cedar fence:
Reciprocating Saw — for demo
String Line — essential for keeping posts straight
Postsaver Sleeves — rot protection at the ground line (more on these below)
Post Level — makes plumbing posts so much easier
Laser Level — for finding consistent cut heights across all posts
Stainless Ring Shank Nails — important for cedar; prevents rust staining
Trim Head Screws — minimal appearance for visible fasteners
Wagner Control Pro 170 Sprayer — game changer for staining large projects fast
Fence Stain — Cabot in Honey Teak ← see note below
Want to know exactly what this fence cost? I have a separate, detailed cedar fence cost breakdown that includes material costs, contractor pricing, cost per foot, and the total amount I saved by building it myself.
Demo
Demo of the old fence was quick and easy. My buddy Pete generously showed up to help me with quick demo. We used reciprocating saws and quickly cut through the 2x4 rails, cutting out the old panels away from the posts.


Cutting out these large panels was not only quick, but made it easy to stack them on the trailer to haul away.

We had all the panels off in no time, just leaving all of the posts in concrete.

We tried digging them out by hand, which was not easy and taking a ton of time. So we got smart and decided to try and pull them out with a chain and Pete’s truck, which was so fast and easy…. and fun :)


All of the posts popped right out like carrots! We had the whole fence line cleared in no time. With Pete’s help, demo of the whole fence and posts took less than 3 hours.
Post Holes
I want to space out the post holes 6’ apart, which is the length of one fence picket placed horizontally.
We rented a gas powered hydraulic auger to make quick work of this. We marked out the locations and Pete helped me quickly dig all of the holes. Running a string line is smart to make sure your post holes run in a straight line. As we moved along, I’d measure off the next hole placement. In total, I have 40 posts.
Make sure you get your utilities marked before you dig! We’re digging down 24” for each post.

The string line is offset so I don’t bump or alter the line as I work down the line.
With all of the holes dug, I can now start prep work to get the posts in the ground. I put a couple inches of small rocks in the bottom of each hole for better drainage and then roughly placed all of the posts in the holes.


In my Outdoor Shower build, I used Postsaver rot protection sleeves on each post. These posts are tar lined and protect at the ground line where the post is most susceptible to rot. The top of the sleeve is placed two inches above the depth of the hole (so in this case, 26”).
I have more detailed info on these sleeves HERE

The sleeve then heat-shrinks to fit the post with a heat gun or torch. You then roll over the sleeve with a roller to ensure a good seal to the post.


I then set the post. I used this post level on all 40 posts. Honestly, it was one of the most useful tools on the entire project because it let me check plumb on two sides at once. And then secured it into position with two temporary 2x4 braces. The braces are screwed into the post and on the other end, screwed to a ground stake.


Each post hole is getting filled with Quikrete, which is a fast setting concrete that sets hard in just 20-40 minutes. One thing I really like about Quikrete is you can pour it in the hole dry, and then add water.
Pro tip: I actually like to add some water to the hole first before pouring. This ensures the water makes it to the bottom of the mix. I also add a slope to the top which will help water drain away from the post.


My city’s code says we can build up to an 8’ fence without a permit so I marked a cut line at the top of each post 8’ from the ground using my circular saw. Measuring from the bottom of the post can be tricky. If you’d like to see how I easily found 8’ on each post, check out the videos in my YouTube video. I explain it well there.

Fence Frame
I’m installing these fence brackets to hold horizontal 2x4 braces between the posts. I installed them with Simpson Strong Tie nails.


Now to cut the braces. A fast and easy way to find a very accurate distance measurement is with this laser distance measure. I love this thing! It has the ability to long range measure with extreme accuracy. All you have to do is set it on one end of your distance to measure and point the laser beam to the other side. And boom. It reads out a precise measurement.
This allowed me to quickly cut out all of the bottom braces and secure them with Simpson Strong Tie screws.


After all posts were cut to height, I cut a notch into the top of every other post using my circular saw and my reciprocating saw.
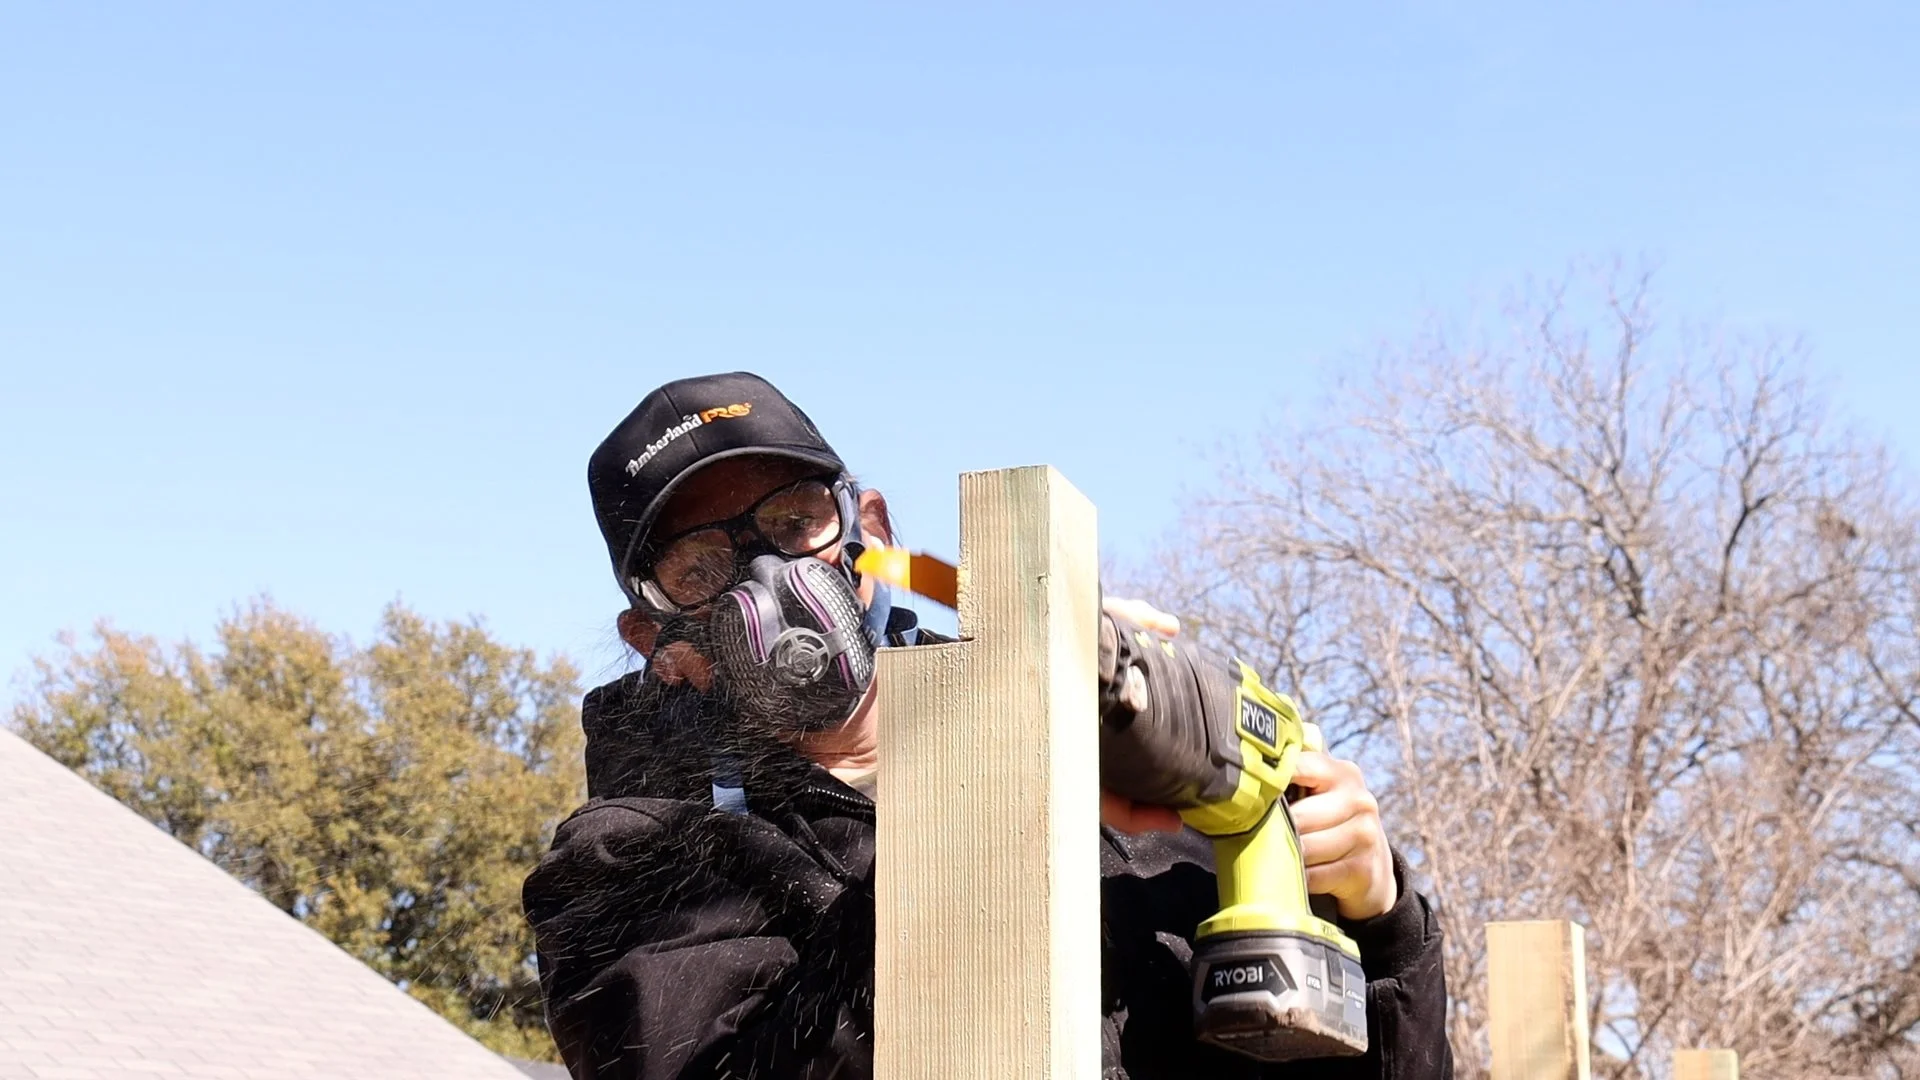
This notch allows one long horizontal 2x4 brace to span two bays and tie three posts together. This really increases the rigidity and strength of the fence. The 2x4 is screwed into the middle post.
Tip: any screws (or any of the fixtures) I am using on this project are rated to be used outdoors.


I also cut and installed center vertical 2x4 supports between the top and bottom braces using screws. These give the pickets a center board to attach to which will keep them from bowing and warping.


Top Cap & Pickets
Ok now let’s attach the top cap, which is the top horizontal board that spans across the top of all of the posts.
I’m using a 2x6 and it’s simply attached using screws into the top rails. I again used a string line to make sure I kept the boards straight with the same overhang depth all the way down.


Fence Pickets
Now on to the fun part… adding pickets!
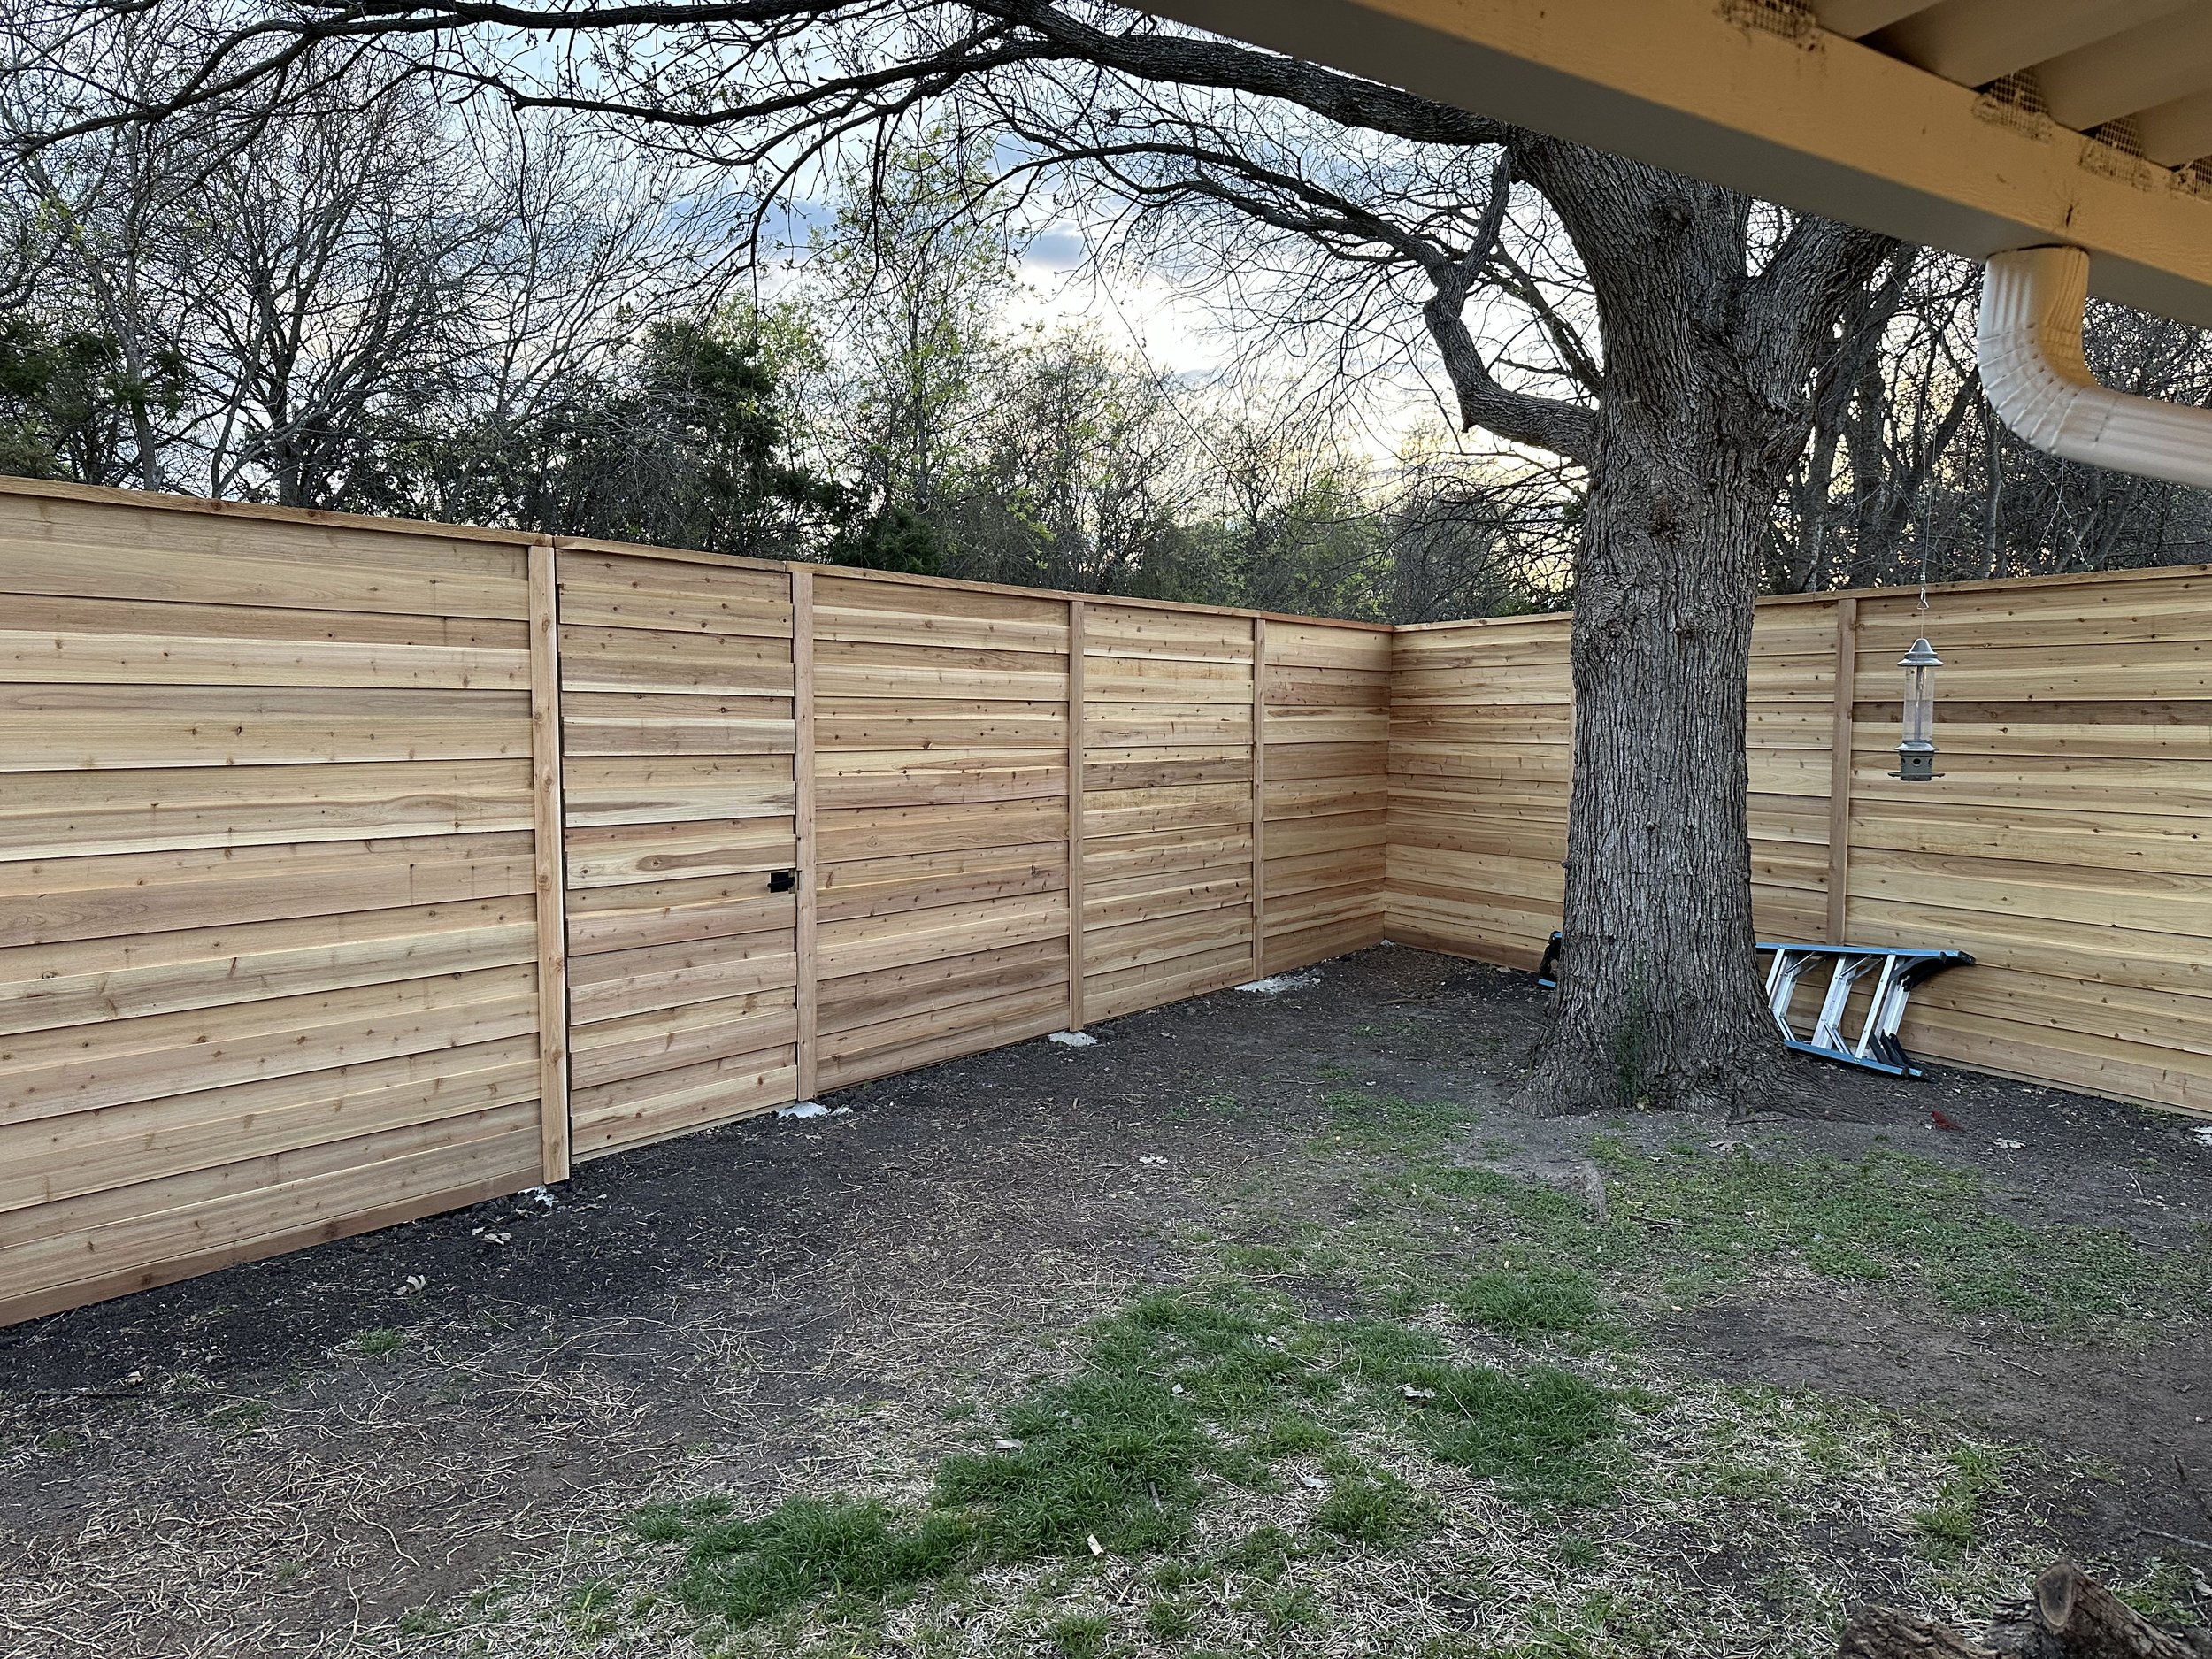
This is a horizontal board on board fence, which will have full coverage and no visibility through the panels. We don’t get much wind here, and this frame is built very strong, so we’re not worried about not having air gaps.
To make attaching these pickets go quickly, I’m using my pneumatic siding/fencing nailer that uses ring shank nails. It’s important to pick exterior rated nails (stainless steel is best) to avoid any rusting of the nails and staining of the wood.

The cedar pickets I’m using are 5.5” wide. I made a spacer board that is 4” wide that quickly let’s me space out my first row of boards, leaving a 4” gap. This will give my second row (the pickets that cover the gaps) 3/4” on each side of coverage.

I nailed the picket to each end and the center vertical board, double checking that they are level as I work my way down.

The top, overlapping boards are secured the same way, overlapping the first row by 3/4 inches. As I worked I’d put my level up on every few boards to make sure I was keeping a level pattern.

After all of the pickets are up, the middle gets screwed to the middle vertical support board with exterior trim head screws. These screws will ensure that the pickets stay flat and in place.

To see how I handled the corners, be sure to watch the YouTube video.
Gate
Let’s add a gate. I’m going to build it so it practically disappears and most importantly, doesn’t sag. Here’s how:
I bought this anti-sag gate hardware kit, which makes building a gate so easy!

The instructions are straight forward. I cut 2x4’s to size and the metal brackets just screws to the 2x4s, creating a sturdy frame.


I then set the gate in place, held up with some wood as an extra hand to shim it into place so I could attach the hinges.


I then worked from the top down and added pickets just like before. Except for this section I secured the pickets with trim head exterior screws.

Before I finish the second half of pickets on this gate, I’m going to attach this gate latch hardware. It’s super simple to attach with just one drilled hole through the frame and a few screws. I love that this latch allows the door to be unlatched and opened from the front or the back. And it looks and works great!


Now that the latch is in place, I need to cut the next slat so that it fits around the handle. To do this I marked my cut lines and then carefully made the cuts with my multi tool.


I then finished the slats and placed a top cap.


Trim
The very last step for the build is to add 1x4 vertical trim to cover the seams, nails and screws. I attached these with trim head screws.

Stain
For the finish I used Cabot stain in Honey Teak — a stained sealer combo that enhances the natural cedar color without masking it. It looks warm, natural, and really beautiful on cedar. I cannot recommend it enough for any cedar project.

For application I used the Wagner Control Pro 170 airless sprayer — this thing made the whole job exponentially faster compared to brushing. I switched to the 413 spray tip for stains and pulled it right from a 5-gallon container. A few test passes, then I was rolling. I overlapped each pass by about half for full coverage, and after a few minutes wiped off any unabsorbed stain with a lint-free rag.
If you have a large staining project, this sprayer is worth every penny.
The color is very similar to cedar. It’s transparent, warm and natural. And very importantly…. not orange.
To apply the stain, I’m using my sprayer, which speeds up the process exponentially. I sprayed it on and after a few minutes, went back and wiped the excess with a lint free towel. I’m really happy with it!

DONE!
Here’s the before and after…


We’re so happy with it!

As a reminder, the full video tutorial, with many more details is HERE

What Did This Cedar Fence Cost?
One of the most common questions I get about this project is how much it cost.
This fence project included approximately 200 linear feet of board-on-board cedar fencing and cost just under $6,700 in materials, hardware, stain, equipment rental, and disposal fees. That works out to about $33.50 per linear foot.
Here is a breakdown of the major expenses:
Posts and 2x4s: $1,550
Cedar pickets: $1,950
Trim and top cap: $1,000
Concrete: $580
Hardware (nails, screws, brackets): $370
Two gates: $350
Stain: $475
Post Saver sleeves: $300
Auger rental: $300
Old fence disposal: $80
Before starting the project, I received a quote from a local fence company for approximately $18,700 to replace the entire fence line. By tackling the project myself, I saved roughly $12,000 while getting exactly the design and materials I wanted.
Want the complete breakdown? I put together a detailed article covering every major expense, cost per linear foot, contractor pricing comparison, and the full budget for this 200-foot fence project: How Much Does a Cedar Fence Cost?
Keep in mind that lumber prices vary significantly by region and over time, so your costs may be higher or lower than mine.
For additional project details and a complete walkthrough of the build, be sure to watch the video.
FAQ’s
How many linear feet is this fence?
This project included approximately 200 linear feet of board-on-board cedar fencing, including two custom gates.
Won’t the top cap & pickets hold water?
No. Water does not actually pool on the top cap or the pickets. Any moisture evaporates before that could happen. And the fence is built from cedar, which naturally resists rot and insects much better than many other wood species. Proper staining and maintenance also help protect the fence over time.
Won’t a solid fence like this blow over in strong winds?
This fence has been standing for over two years and hasn’t moved. While every location is different, we don’t live in an area that experiences extreme winds. Proper post installation, concrete footings, and sturdy framing are critical to the fence’s strength.
Why did you put the “good side” of the fence toward the neighbors?
Around here, the common practice is that whoever pays for the fence gets to choose which side faces their property. That said, I don’t really consider either side ugly. Our neighbors on both sides love the side facing them.
How much did this cedar fence cost?
This 200-linear-foot board-on-board cedar fence cost just under $6,700 to build, or about $33.50 per linear foot. A local contractor quoted approximately $18,700 for the same project.
For a complete breakdown of every expense, see my detailed cedar fence cost breakdown.
What stain did you use?
I used Cabot stain in Honey Teak. It added warmth to the cedar while still allowing the natural beauty of the wood grain to show through. I love that it’s not a varnish but instead a penetrating stain. I searched for a long time for the right one and it’s held up beautifully. And also easy to reapply when needed.
What do you think? I’d love to hear!
Happy to answer any questions below, or in the comment section of the video. See you on the next project!
Subscribe to my YouTube channel for many more tutorial videos!
Check Out These Similar Projects


Follow Maker Gray:
Instagram @MakerGray https://www.instagram.com/makergray/
Facebook https://www.facebook.com/MakerGray/
TikTok: https://bit.ly/3lXgdHh
If you liked this project and want to stay up to date with what I’m building, then be sure to sign up for my emailed newsletter and you’ll get an email when I post something new.
(Most of the links listed above are affiliate links. As an Amazon Associate I earn from qualifying purchases. Thank you for supporting me in this way.)